Access ROS 2 network from external device
Info
This section only applies to Linux-based computers. If you are a Windows user we refer to the options available in Cerebra Lab to interact with the robot.
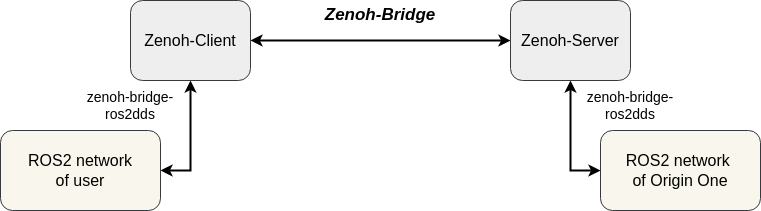
The ROS 2 network on the robot (or Vertex) is separated from the ROS 2 network of external devices, such as a user’s laptop or another compute module, to ensure that any ROS 2 overhead on the user-side does not affect the QoS and performance of the robot’s ROS 2 network. To maintain this separation, the robot uses a Zenoh-Bridge, which funnels the robot’s ROS 2 network to that of the user. The standard ROS 2 middleware, which uses DDS, is known to encounter issues when communicating over wireless networks, which can affect devices outside the robot’s network. The Zenoh-Bridge helps improve communication over both wireless and wired networks, allowing external devices to connect to the ROS 2 network reliably.
As a user, to access the robot’s ROS 2 topics, services, and clients, you need to connect through this Zenoh-Bridge. This is done by running a Zenoh-client on your external device, which then connects to a Zenoh-server on the robot. Only through this connection can you access the ROS 2 network of the robot and, for example, run commands like ros2 topic list or use tools like rviz2. Since the robot’s internal ROS 2 network is configured to be unreachable externally, using the Zenoh-Bridge is the only way to connect from an external device.
Setup the Zenoh-server on the robot
Create Zenoh configuration file
To start the Zenoh-server on the robot, you need to create a configuration file. This file specifies the IP address and port on which the Zenoh-server will listen for incoming connections. The configuration file should be placed in the /data/app/avular/system/zenoh directory on the robot. You can create the file by running the following command:
sudo mkdir -p /data/app/avular/system/zenoh
cd /data/app/avular/system/zenoh
sudo nano config.json
In the configuration file, you should specify the IP address and port on which the Zenoh-server will listen for incoming connections. The configuration file should look like this:
{
    plugins: {
      ros2dds: {
            // your ROS2 related configuration
        }
    },
    // zenoh related configuration
    mode: "peer",
    listen: {
        // listen for TCP connections on all interfaces on port 7447
      endpoints: [
            "tcp/0.0.0.0:7447"
        ]
    },
    // disable all scouting, thus only explicit incoming connections on listen endpoint are accepted
    scouting: {
      multicast: {
        enabled: false
        },
      gossip: {
        enabled: false
        }
    }
}
Add the Zenoh-server to the Avular Compose file
To start the Zenoh-server on the robot, you need to add the Zenoh-server to the Avular Compose file. The Zenoh-server is started as a service in the Avular Compose file, which is located in the /data/app/avular/system/docker-compose.yml directory on the robot. You can add the Zenoh-server service by running the following command:
sudo nano /data/app/avular/system/docker-compose.yml
In the Avular Compose file, you should add the Zenoh-server service to the services section. The Zenoh-server service should look like this:
  zenoh:
    image: 'eclipse/zenoh-bridge-ros2dds:0.11.0'
    container_name: zenoh
    network_mode: host
    init: true
    privileged: true
    environment:
      ROS_DISTRO: humble
      <<: *common-variables
    volumes:
      - type: bind
        source: "/data/app/avular/dds"
        target: "/data/app/avular/dds"
      - type: bind
        source: "/data/app/avular/system/zenoh/config.json"
        target: "/config.json"
    deploy:
      restart_policy:
        condition: always
        delay: 10s
        window: 120s
    command: '-c /config.json'
Start the Zenoh-server
To start the Zenoh-server on the robot, you need to run the following command:
sudo avular_launch_system_containers
This command will start the Zenoh-server service in the Avular Compose file, which will start the Zenoh-server on the robot. The Zenoh-server will listen for incoming connections on the IP address and port specified in the configuration file. The Zenoh-server will always be running on the robot, so you don't need to start it manually.
Setup the Zenoh-client on your computer
The remainder of this section will explain how to install and set up the Zenoh-client, enabling you to interface with the ROS 2 network of the robot from your computer.
-
Install CycloneDDS
CycloneDDS is an alternative to the default ROS 2 implementation being FastDDS. CycloneDDS was found to be provide a much more stable communication when the number of nodes and messages increase. You may install the CycloneDDS middleware using the following command:
sudo apt install ros-*distro*-rmw-cyclonedds-cppThe value
*distro*needs to be replaced by the ROS 2 distro you're using. Avular supports usinghumble. -
Export CycloneDDS
Exporting CycloneDDS to your
bashrcscript ensures that it is automatically being used when opening a new terminal on your (companion) PC. You may do so by runningecho "export RMW_IMPLEMENTATION=rmw_cyclonedds_cpp" >> ~/.bashrc. Alternatively, you may also runexport RMW_IMPLEMENTATION=rmw_cyclonedds_cppin each terminal you open that is related to ROS 2. When using docker you may use the environmental variables option when starting the docker image. -
Install the Zenoh bridge
To start a Zenoh-client you must first install a specific version of the
zenoh-bridge-ros2dds. The client can run as a standalone binary or in a docker container. Here, we choose the standalone binary. The official documentation can be found on this website. Yet, in short, it implies running the following commands in a terminal on your (companion) PC.echo "deb [trusted=yes] https://download.eclipse.org/zenoh/debian-repo/ /" | sudo tee -a /etc/apt/sources.list > /dev/null sudo apt update sudo apt install zenoh-bridge-ros2dds=0.11.0 -
Start the Zenoh client
To start the Zenoh-Client, which will open the bridge with the Zenoh-server on the robot, you should run
zenoh-bridge-ros2dds -m client -e tcp/<robot-ip>:7447in a terminal (please first run
export RMW_IMPLEMENTATION=rmw_cyclonedds_cppin case it was not added to youbashrcscript). The robot IP address depends on how you are connected to the robot. -
Check the connection
Open a new terminal and run
ros2 topic list, for example, you should now see all nodes running on the Vertex ROS network (please first runexport RMW_IMPLEMENTATION=rmw_cyclonedds_cppin case it was not added to youbashrcscript).
Once you have connected to the Zenoh bridge, all topics, services, and actions will be available in your ROS environments like they are on the robot itself. You can use the same commands as you would use on the robot to interact with the ROS 2 network from an external device. Applications like Rviz2 also work when connected to the Zenoh bridge. You may now also start Rviz by running rviz2 in the same terminal. Rviz will show all the ROS 2 topics that are available on the robot, after which you can start developing your own application.
One important thing to note is that the ROS_DOMAIN_ID in the ROS environment on the external device should be different from the ROS_DOMAIN_ID set on the robot. Else you will receive duplicate messages.
If you are running Docker containers on your PC, you can also use a Zenoh container to automate the launching of the Zenoh bridge. When you proceed with this method, ensure to use the eclipse/zenoh-bridge-ros2dds:0.11.0 image with version 0.11.0 such that it is compatible with the Vertex One. Please refer to the official Zenoh documentation for more information.
Info
Details on the interface definition of the Avular API are found here
Code
Some code examples to get you up to speed can be found on here